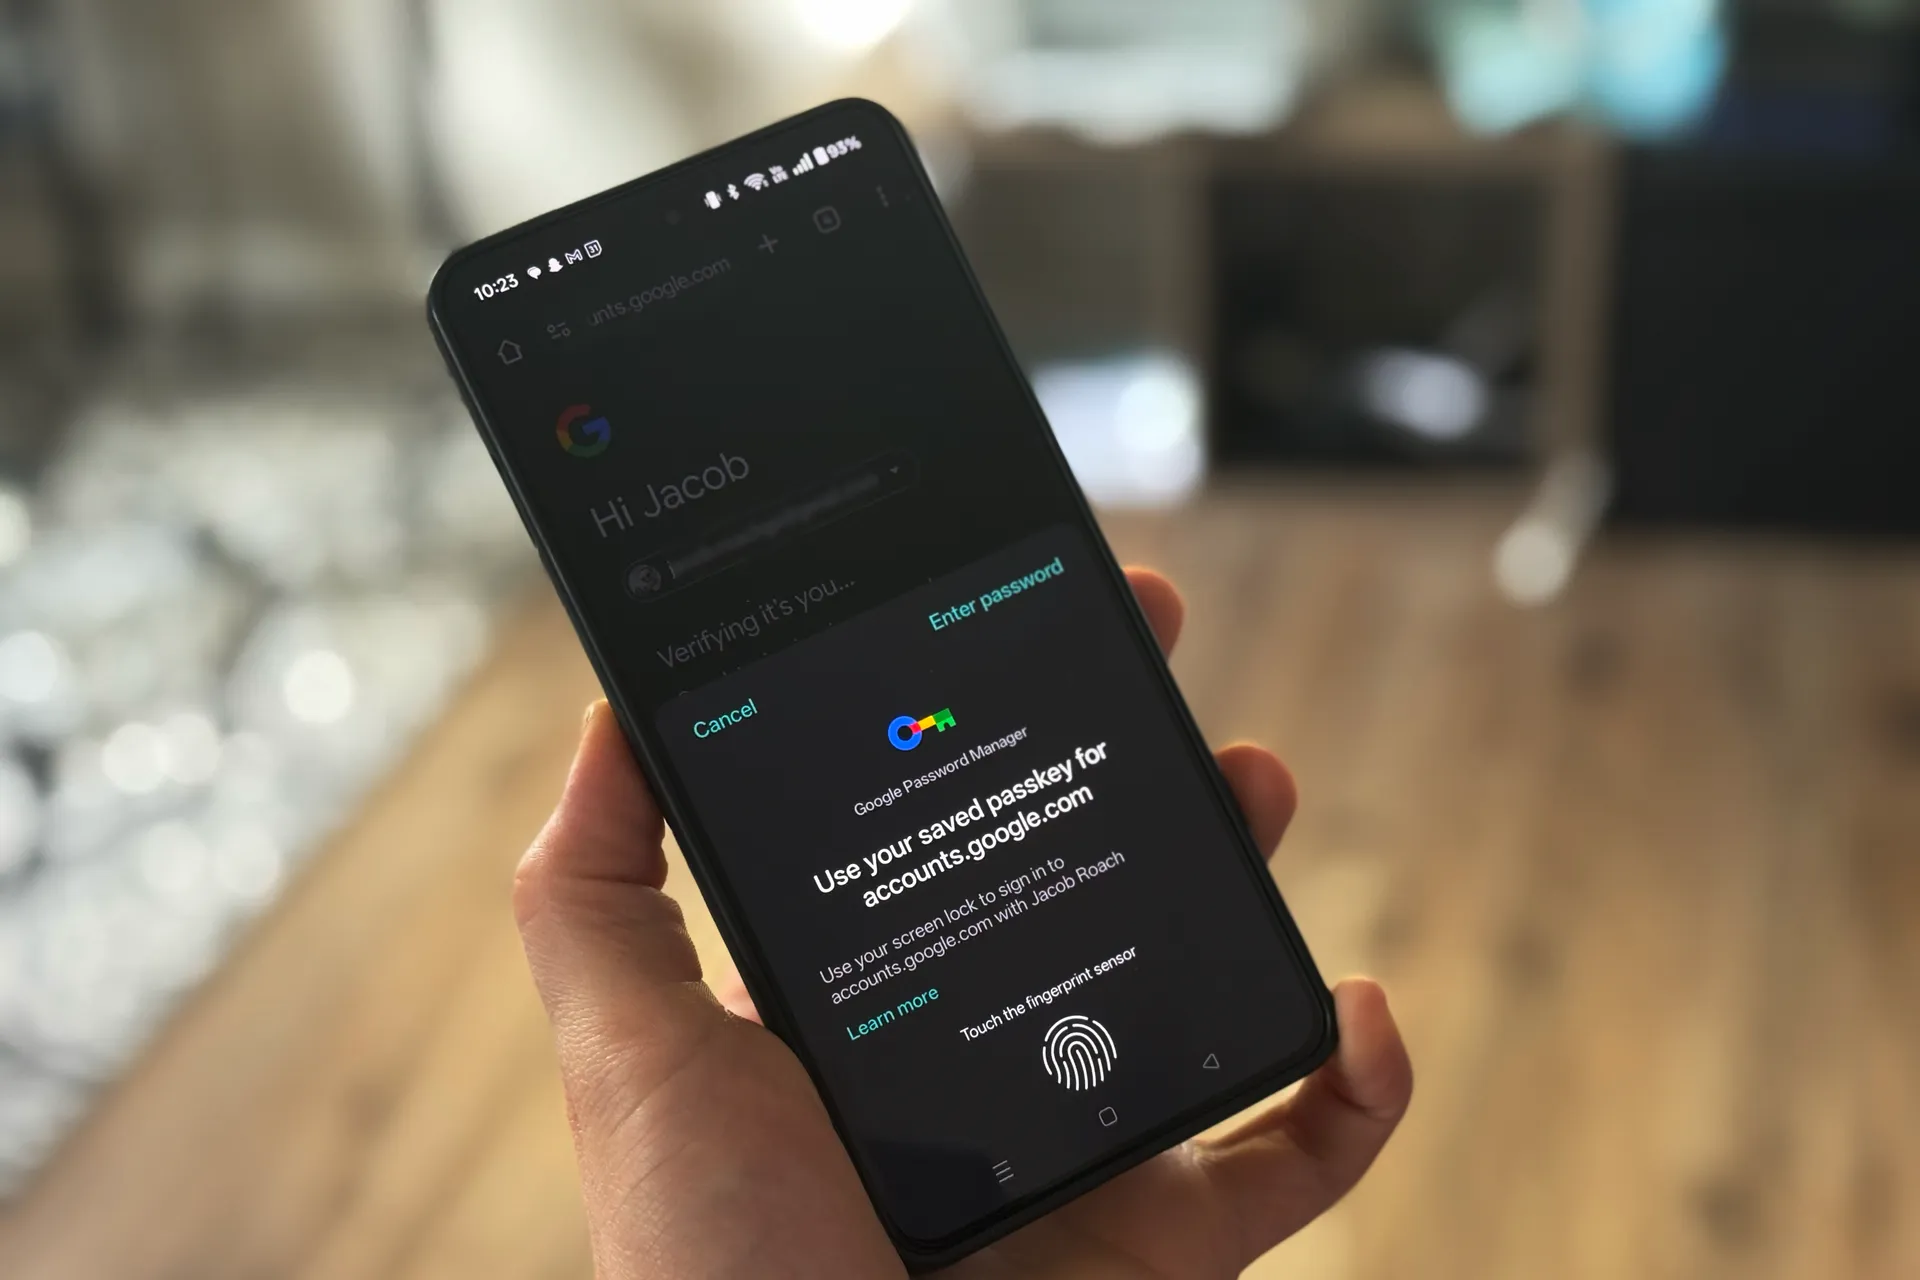
Google wants you to start using passkeys. Its vision is to “progress toward a passwordless future," allowing you to store passkeys in the Google Password Manager service. For websites that support the login method, Google now allows you to generate, store, and sync passkeys. The problem is actually finding a consistent way to do it.
It’s easy to change your password, but it’s not so easy to add passkeys to an account you’ve already created, much less manage them solely in your browser. Still, you can use passkeys with the Google Password Manager on supported websites; you'll just need to jump through a few hoops first.
You can learn more about passkeys here, but in short, they're a method to confirm you are who you say you are so that you don't have to remember a long password for every app and website you log in to. You can use a passkey for your Google account, but you can also store passkeys for other websites with the Google Password Manager, which is available on Chrome or directly through Android.
To use a passkey with your Google account, go to g.co/passkeys and follow the prompts. You’ll log in to your Google account and create a passkey, either bound to your device or stored in a third-party password manager. If you aren’t using a third-party password manager, your Google passkey will be bound to the device you’re using. Apple devices sync your passkeys across other Apple devices with iCloud Keychain, but otherwise you’ll need the device you created the passkey on to log in.
Creating a passkey for your Google account is simple. What’s important is that you’re doing it on a device that supports passkeys. Here’s what you need:
- A computer with Windows 10, macOS Ventura, ChromeOS 109, or newer; or a phone with iOS 16 or Android 9, or newer;
- A supported browser (Chrome 109, Safari 16, Edge 109, Firefox 122, or newer).
Once you’ve made a passkey, you can manage it at myaccount.google.com. There, select Security, and then choose Passkeys and Security Keys to see the passkeys you have. You can—and likely will, if you aren’t using a third-party password manager—have multiple passkeys for different devices, even if they’re used to log in to the same account.
Google would like you to believe that saving passkeys in the Google Password Manager happens almost magically. You sign in to or sign up for an account, Google steps in and asks if you want to save a passkey, and you’re done. Google even says it can upgrade accounts stored in Google Password Manager automatically with passkeys.
The process, unfortunately, is more involved. First, you need to enable passkeys for the Google Password Manager. They're enabled by default, but to double check, open Chrome, and follow these steps:
- Click the three dots in the upper right corner;
- Hover over Passwords and Autofill and choose Google Password Manager from the menu;
- In the tab that opens, choose Settings;
- Ensure the Offer to Save Passwords and Passkeys setting is turned on.
Now, we need a website that supports passkeys. There are a handful of different directories online—Hanko’s directory is the easiest, but this community directory is more comprehensive. I’ll use Best Buy for this example, which supports passkeys.
To set up a passkey with Google Password Manager, you need your credentials for the service in question already stored. For Best Buy, go to the website and log in. When the Google Password Manager prompts you, choose to save your username and password in Google Password Manager.
With that done, follow these steps on the Best Buy website:
- Select the drop-down for your account name, and choose Account Settings;
- Under the Account Security box, choose Passkey (Face or Fingerprint Sign-In);
- Select Create a Passkey.
Once you create a passkey, a pop-up will appear asking you to verify your identity with another device logged in to your Google account. If this is the first passkey you’re creating with Google Password Manager, you’ll also need to set up a PIN.
Every service is a bit different, but you need to initiate the passkey creation from the service you want a passkey for, not from Google Password Manager. Once the passkey is stored, you’ll see it alongside your normal login credentials in Google Password Manager.

About author

Jessica
Quisque sed tristique felis. Lorem visit my website amet, consectetur adipiscing elit. Phasellus quis mi auctor, tincidunt nisl eget, finibus odio. Duis tempus elit quis risus congue feugiat. Thanks for stop Tech Blog!
You may also like


0 Comments
There is no comment yet.